How To – Edit A WordPress Page In Classic Editor
 Here at XRF Digital, the majority of the websites we create are built on a WordPress platform, WordPress is super easy to edit by people with a low level of IT knowledge as well as those who are experts.
It is very important to keep the content on your website up to date, and informative, the key to a good website is delivering the best user experience, so information that will help a visitor is key, take a look at Page Quality How Do You Rank
In this blog, we show you how to edit the content on an existing page on your website…
Finding The Page To Edit
Type in your website URL followed by /wp-admin for example www.mywebsite.co.uk/wp-admin
Login, this will take you to the backend of your website where all the magic happens, don’t forget that your website is LIVE so any changes you make will also change the front end (what your visitors see) now that sounds like a silly thing to say as this is the point, right? But we recommend that you always do a page preview first and if you are happy with how the changes look, only then click on update!
In the video below we show you how to locate the page you want to edit, and what you need to do…
Adding Links To Your Pages
There are two types of links you can add to your content, external links which will have links to other websites away from your own URL, and internal links, these links will connect to other relevant pages within your website. For more on internal links and their importance see our previous blog Internal Links
To add a link to the content of your website you follow the above steps, then you choose the copy you want as your anchor text and add the URL, take a look at the following video…
Let’s talk about Headers (H1, H2, H3…)
What Are Headers?
Headers in essence are titles within your copy that help a search engine to understand what the page is about, and for users to quickly find the information they are looking for. Back in the day, many would stuff all the headers with a keyword, but fortunately, nowadays SEO is all about delivering a good user experience where the search engine is looking for far more information than just how many times a keyword is repeated and where.
The Headings are to help a user to scan through your page to find the right information they are looking for, if a user cannot find what they are looking for quickly they will simply go somewhere else, providing you with a bounce, not good for SEO, and they will go somewhere else to find the answer.. not good for business!
I am very pleased that also now copywriters are considering accessibility and are writing their copy for those users with screenreaders, screenreaders have the ability to skip through the headers. So I strongly recommend you have this in mind when you create your copy, as I am sure this will have an impact on your ranking if not now, definitely in the future.
How Headers Are Used
In classic editor in WordPress, you will have a choice of Headers 1 through to Header 6 what we do not see in the area we are in unless you choose to (see video) is that the heading you choose is converted into HTML coding heading tags <h1> (heading 1) through to <h6> (heading 6).
So the structure of your content should be similar to this…
- Heading 1 – Your Main Header regarding the topic.
- Heading 2 – Used to start the section regarding that topic
- Heading 3 – To cover an exact topic
If you have a large amount of copy then you can use headings 3, 4, 5 and 6 to go into more depth, it is recommended that you break your content up with headers as explained earlier for easy scanning, each section being no more than around 300 words.
Take a look at the video to see how you create headers when editing your page in WordPress.
Note Your heading 1 <h1> is not the same as the title of your page
Adding Images and Videos To Your WordPress Page
To help break up content and keep a visitor engaged it helps to add images and videos. Such as in this blog I have created videos on each section to help you understand better how you use the different areas of the classic editor within WordPress.
Adding images and videos is very easy to do you can either add images directly into your media library, or you can add them as you go such as when you create a page. In the following video, I add an image whilst creating a page…
And for adding a video…
Adding Videos from other websites
You can also add videos from other destinations such as YouTube, please make sure that you have permission first.
Simply go over to YouTube (for example) find the video you want to share within your content and paste the URL.
So now we have the content organised, and we have added links, headers, and media its time to look at what else we need to do with our page before we hit publish…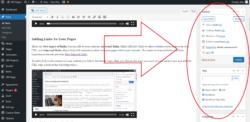
In WordPress classic editor to the right of where you have been putting in your content (see screenshot image) you will see further options, let us take a look at them now.
So our first section is Publish
Publish Options In WordPress
Status Area
Preview:
Whilst you are amending or creating new content on your website, the preview button will show you how it will look once it is published on your live site… USE THIS! MY TIP – Do not publish anything until you have checked it in preview.
Draft:
As you begin to create new content on a new page you can save the page as a draft, this means it is only visible to the user logged in and not live on the website. If you click on the word edit you will have a drop-down option that allows you to mark the page as Pending Review…. with most of our clients there is usually only one person responsible for the content on the website, so in this instance, we use Draft as the option.
Visibility:
We (XRF Digital) have all of our pages set to public as we are creating content for anyone to see, and this is how the majority of our clients will want to have their pages. However, you can create content that can be marked private and you can create password protection on your pages should you wish to. All the options within this area are self-explanatory, once you have chosen the right option for you simply click on OK.
 Revisions:
This shows the various changes to your content and allows you to go back to a previous state. If you click on browse, you will see the revisions, at the top of the window to the left you will see a ‘Go to editor’ to get back to your classic editor view (see screenshot). This has been easily missed by some of our clients in the past who have closed down the window and lost some of their work, it’s not the clearest return action in the world!
Publish immediately:
As the blog writer for XRF Digital, I find this very handy, as do many of our clients. This allows you to schedule when your blogs will be published. Simply click on edit and change the date if you want to schedule a blog to be published in the future. Once you make that change and click on OK you will notice that the blue publish button will change from ‘Publish’ to ‘Schedule’ both meaning that once you click on the blue button the article will go live on your website immediately (Publish) or will be sitting in the back end waiting for the date and time you have specified to go live (Schedule).
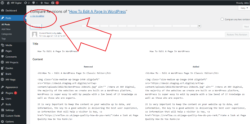
Let’s Talk about Tags and Categories, as there can be some confusion as to what these are and how they should be used.
Tags & Categories In WordPress
Tags and Categories are WordPress taxonomy’s basically how WordPress clarifies the content of your pages. This means that when a visitor comes to your website they will be able to find pages with relevant information by way of category or tag.
How To Use Tags In WordPress
Use tags to drill down to specific detail in your content, when I create a category using SEO, the tags I use will be more specific to that category. If I was writing about how link building can help you with your SEO – SEO is my category and ‘link building’ ‘Internal links’ and ‘external links’ for example would be my tags.
How To Use Categories In WordPress
Where tags are looking at more detailed information, categories are far broader, so for example I write many blogs on SEO so that is my Category.
For both categories and tags you can create new ones – Tags – type in the empty box and click the add button or for Categories click on +Add New Category.
So there you have it a very basic and I hope straightforward How-To Edit A Page In WordPress, if I have missed anything please feel free to get in touch, and I can add to this post going forward.